Indentation hardness measures the ability to withstand surface indentation (localized plastic deformation) and the resistance of a sample to material deformation due to a constant compression load from a sharp object. Tests for indentation hardness are primarily used in engineering and metallurgy fields. The traditional methods are based on well-defined physical indentation hardness tests. Very hard indenters of defined geometries and sizes are continuously pressed into the material under a particular force. Deformation parameters, such as the indentation depth in the Rockwell method, are recorded to give measures of hardness. Common indentation hardness scales are Brinell, Rockwell and Vickers.
See also: Hardness
Brinell Hardness Number – Brinell Scale
Brinell hardness test is one of indentation hardness tests, that has been developed for hardness testing. In Brinell tests, a hard, spherical indenter is forced under a specific load into the surface of the metal to be tested. The typical test uses a 10 mm (0.39 in) diameter hardened steel ball as an indenter with a 3,000 kgf (29.42 kN; 6,614 lbf) force. The load is maintained constant for a specified time (between 10 and 30 s). For softer materials, a smaller force is used; for harder materials, a tungsten carbide ball is substituted for the steel ball.
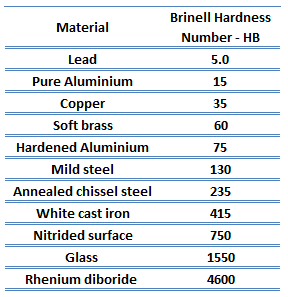
The test provides numerical results to quantify the hardness of a material, which is expressed by the Brinell hardness number – HB. The Brinell hardness number is designated by the most commonly used test standards (ASTM E10-14[2] and ISO 6506–1:2005) as HBW (H from hardness, B from brinell and W from the material of the indenter, tungsten (wolfram) carbide). In former standards HB or HBS were used to refer to measurements made with steel indenters.
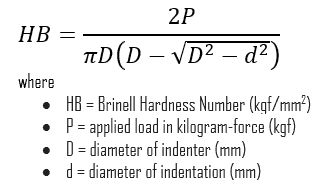
The Brinell hardness number (HB) is the load divided by the surface area of the indentation. The diameter of the impression is measured with a microscope with a superimposed scale. The Brinell hardness number is computed from the equation:
There are a variety of test methods in common use (e.g. Brinell, Knoop, Vickers and Rockwell). There are tables that are available correlating the hardness numbers from the different test methods where correlation is applicable. In all scales, a high hardness number represents a hard metal.
 Besides the correlation between different hardness numbers, there are also some correlations possible with other material properties. For example, for heat-treated plain carbon steels and medium alloy steels, another convenient conversion is that of Brinell hardness to ultimate tensile strength. In this case, the ultimate tensile strength (in psi) approximately equals the Brinell Hardness Number multiplied by 500. Generally, a high hardness will indicate a relatively high strength and low ductility in the material.
In industry, hardness tests on metals are used mainly as a check on the quality and uniformity of metals, especially during heat treatment operations. The tests can generally be applied to the finished product without significant damage.
See also: Rockwell Hardness Test
See also: Vickers Hardness Test
See also: Knoop Hardness Test
We hope, this article, Brinell Hardness Number – Brinell Scale, helps you. If so, give us a like in the sidebar. Main purpose of this website is to help the public to learn some interesting and important information about materials and their properties.
