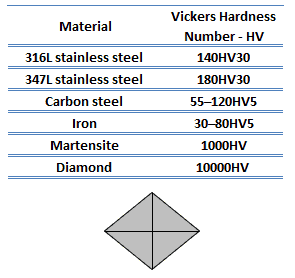
Indentation hardness measures the ability to withstand surface indentation (localized plastic deformation) and the resistance of a sample to material deformation due to a constant compression load from a sharp object. Tests for indentation hardness are primarily used in engineering and metallurgy fields. The traditional methods are based on well-defined physical indentation hardness tests. Very hard indenters of defined geometries and sizes are continuously pressed into the material under a particular force. Deformation parameters, such as the indentation depth in the Rockwell method, are recorded to give measures of hardness. Common indentation hardness scales are Brinell, Rockwell and Vickers.
See also: Hardness
Vickers Hardness Test
 The Vickers hardness test method was developed by Robert L. Smith and George E. Sandland at Vickers Ltd as an alternative to the Brinell method to measure the hardness of materials. The Vickers hardness test method can be also used as a microhardness test method, which is mostly used for small parts, thin sections, or case depth work. Since the test indentation is very small in a Vickers microhardness test, it is useful for a variety of applications such as: testing very thin materials like foils or measuring the surface of a part, small parts or small areas.
The Vickers method is based on an optical measurement system. The Microhardness test procedure, ASTM E-384, specifies a range of light loads using a diamond indenter to make an indentation which is measured and converted to a hardness value. The Vickers test is often easier to use than other hardness tests since the required calculations are independent of the size of the indenter, and the indenter can be used for all materials irrespective of hardness. A square base pyramid shaped diamond is used for testing in the Vickers scale. For microindentation typical loads are very light, ranging from 10gf to 1kgf, although macroindentation Vickers loads can range up to 30 kg or more.
See also: Brinell Hardness Test
See also: Rockwell Hardness Test
See also: Knoop Hardness Test
We hope, this article, Vickers Hardness Test – Vickers Hardness Number, helps you. If so, give us a like in the sidebar. Main purpose of this website is to help the public to learn some interesting and important information about materials and their properties.