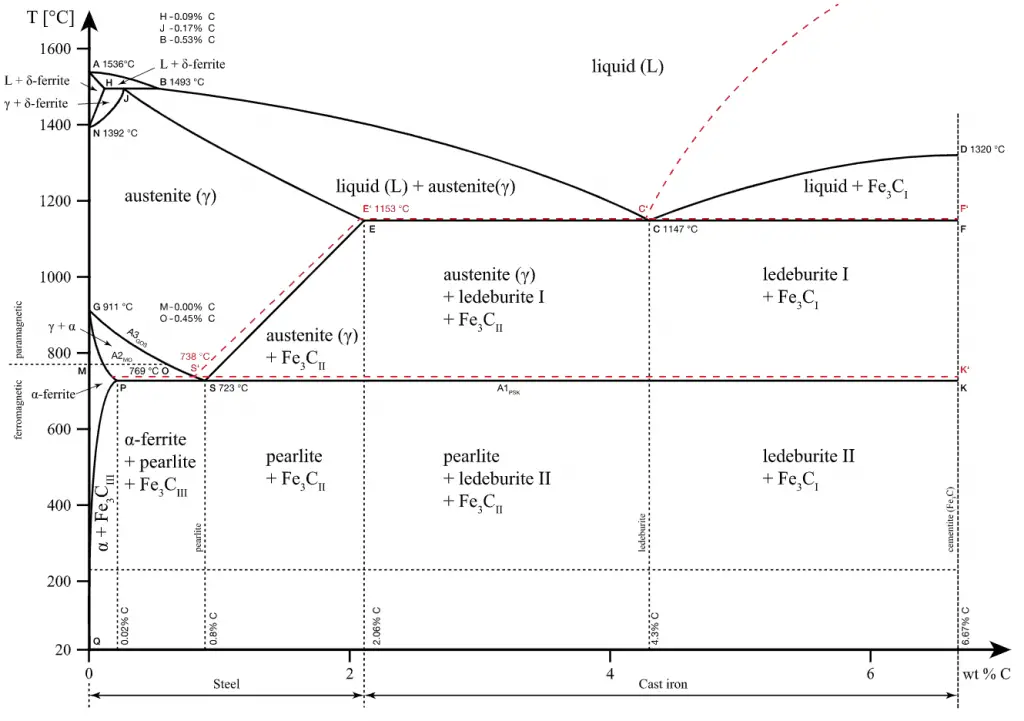
Steels are iron–carbon alloys that may contain appreciable concentrations of other alloying elements. Adding a small amount of non-metallic carbon to iron trades its great ductility for the greater strength. Due to its very-high strength, but still substantial toughness, and its ability to be greatly altered by heat treatment, steel is one of the most useful and common ferrous alloy in modern use. There are thousands of alloys that have different compositions and/or heat treatments. The mechanical properties are sensitive to the content of carbon, which is normally less than 1.0 wt%. According ot AISI classification, carbon steel is broken down into four classes based on carbon content.
Mechanical Properties of Steels
Materials are frequently chosen for various applications because they have desirable combinations of mechanical characteristics. For structural applications, material properties are crucial and engineers must take them into account.
Strength of Steels
In mechanics of materials, the strength of a material is its ability to withstand an applied load without failure or plastic deformation. Strength of materials basically considers the relationship between the external loads applied to a material and the resulting deformation or change in material dimensions. Strength of a material is its ability to withstand this applied load without failure or plastic deformation.
Ultimate Tensile Strength
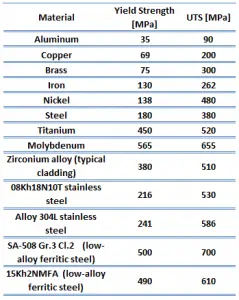 The ultimate tensile strength is the maximum on the engineering stress-strain curve. This corresponds to the maximum stress that can be sustained by a structure in tension. Ultimate tensile strength is often shortened to “tensile strength” or even to “the ultimate.” If this stress is applied and maintained, fracture will result. Often, this value is significantly more than the yield stress (as much as 50 to 60 percent more than the yield for some types of metals). When a ductile material reaches its ultimate strength, it experiences necking where the cross-sectional area reduces locally. The stress-strain curve contains no higher stress than the ultimate strength. Even though deformations can continue to increase, the stress usually decreases after the ultimate strength has been achieved. It is an intensive property; therefore its value does not depend on the size of the test specimen. However, it is dependent on other factors, such as the preparation of the specimen, the presence or otherwise of surface defects, and the temperature of the test environment and material. Ultimate tensile strengths vary from 50 MPa for an aluminum to as high as 3000 MPa for very high-strength steels.
Example – Ultimate Tensile Strength – Low-carbon Steel
Ultimate tensile strength of low-carbon steel is between 400 – 550 MPa.
Example – Ultimate Tensile Strength – Ultra-high-carbon Steel
Ultimate tensile strength of ultra-high-carbon steel is 1100 MPa.
Yield Strength
The yield point is the point on a stress-strain curve that indicates the limit of elastic behavior and the beginning plastic behavior. Yield strength or yield stress is the material property defined as the stress at which a material begins to deform plastically whereas yield point is the point where nonlinear (elastic + plastic) deformation begins. Prior to the yield point, the material will deform elastically and will return to its original shape when the applied stress is removed. Once the yield point is passed, some fraction of the deformation will be permanent and non-reversible. Some steels and other materials exhibit a behaviour termed a yield point phenomenon. Yield strengths vary from 35 MPa for a low-strength aluminum to greater than 1400 MPa for very high-strength steels.
Example – Yield Strength – Low-carbon Steel
Yield strength of low-carbon steel is 250 MPa.
Example – Yield Strength – Ultra-high-carbon Steel
Yield strength of ultra-high-carbon steel is 800 MPa.
Young’s Modulus of Elasticity
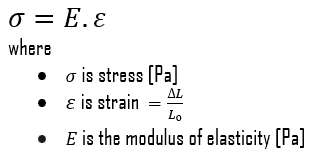
The Young’s modulus of elasticity is the elastic modulus for tensile and compressive stress in the linear elasticity regime of a uniaxial deformation and is usually assessed by tensile tests. Up to a limiting stress, a body will be able to recover its dimensions on removal of the load. The applied stresses cause the atoms in a crystal to move from their equilibrium position. All the atoms are displaced the same amount and still maintain their relative geometry. When the stresses are removed, all the atoms return to their original positions and no permanent deformation occurs. According to the Hooke’s law, the stress is proportional to the strain (in the elastic region), and the slope is Young’s modulus. Young’s modulus is equal to the longitudinal stress divided by the strain.
Example – Young’s modulus of elasticity – Low-carbon Steel
Young’s modulus of elasticity of low-carbon steel is 200 GPa.
Hardness of Steels
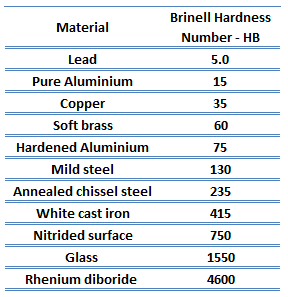 In materials science, hardness is the ability to withstand surface indentation (localized plastic deformation) and scratching. Hardness is probably the most poorly defined material property because it may indicate resistance to scratching, resistance to abrasion, resistance to indentation or even resistance to shaping or localized plastic deformation. Hardness is important from an engineering standpoint because resistance to wear by either friction or erosion by steam, oil, and water generally increases with hardness.
Brinell hardness test is one of indentation hardness tests, that has been developed for hardness testing. In Brinell tests, a hard, spherical indenter is forced under a specific load into the surface of the metal to be tested. The typical test uses a 10 mm (0.39 in) diameter hardened steel ball as an indenter with a 3,000 kgf (29.42 kN; 6,614 lbf) force. The load is maintained constant for a specified time (between 10 and 30 s). For softer materials, a smaller force is used; for harder materials, a tungsten carbide ball is substituted for the steel ball.
The test provides numerical results to quantify the hardness of a material, which is expressed by the Brinell hardness number – HB. The Brinell hardness number is designated by the most commonly used test standards (ASTM E10-14[2] and ISO 6506–1:2005) as HBW (H from hardness, B from brinell and W from the material of the indenter, tungsten (wolfram) carbide). In former standards HB or HBS were used to refer to measurements made with steel indenters.
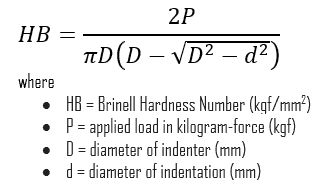
The Brinell hardness number (HB) is the load divided by the surface area of the indentation. The diameter of the impression is measured with a microscope with a superimposed scale. The Brinell hardness number is computed from the equation:
There are a variety of test methods in common use (e.g. Brinell, Knoop, Vickers and Rockwell). There are tables that are available correlating the hardness numbers from the different test methods where correlation is applicable. In all scales, a high hardness number represents a hard metal.
Example – Hardness of Low-carbon Steel
Brinell hardness of low-carbon steel is approximately 120 MPa.
Example – Hardness of High-carbon Steel
Brinell hardness of high-carbon steel is approximately 200 MPa.
Example – Hardness of Damascus Steel
Rockwell hardness of Damascus steel depends on the current type of the steel, but it may be approximately 62-64 HRC Rockwell.
We hope, this article, Mechanical Properties of Steels, helps you. If so, give us a like in the sidebar. Main purpose of this website is to help the public to learn some interesting and important information about materials and their properties.
