The variety of techniques available can also be divided into two groups: surface methods, which are used to identify surface and near surface defects such as cracks and surface porosity, and subsurface methods, that can be used to detect defects that lie under the material’s surface.
- Surface methods
- Subsurface methods
Visual and Optical Testing
Visual inspection involves using an inspector’s eyes to look for defects, such as scratches, presence of debris, corrosion or oxidation. The inspector may also use special tools such as magnifying glasses, mirrors, or borescopes to gain access and more closely inspect the subject area. In nuclear power plants, an extensive fuel inspection programme (including e.g., visual inspections, oxide layer measurements, eddy-current tests of control rods), is carried out under water and supervised by the regulatory body. So that visual testing are usually a part of the Post Irradiation Examination. Visual examinations are also very common in aircraft industry, where over 80 percent of the inspections done to an aircraft are visual inspections, being often used as an initial screening method to detect gross defects and target subsequent testing by other methods.
Eddy-current Testing
Eddy current testing is one of most common electromegnetic testing NDT methods. It uses induced electrical currents to detect defects. Essentially, the technique uses a coil (ECT probe) carrying an alternating current as transducer. This produces an alternating magnetic field parallel to the axis of the coil which in turn induces eddy currents in the surface of the test object. These eddy currents set up a magnetic field opposing that produced by the coil, thus changing the impedance of the coil. Interruptions in the flow of eddy currents, caused by imperfections, dimensional changes, or changes in the material’s conductive and permeability properties, are detected.
Most eddy current testing is based on the measurement of the coil impedance, though it is possible to measure the magnetic field directly. ECT has a very wide range of applications. Since ECT is electrical in nature, it is limited to conductive material. There are also physical limits to generating eddy currents and depth of penetration (skin depth). In general, this technique is used to inspect relatively small areas and is therefore better suited for inspecting areas where damage is already suspected, it nevertheless has a variety of applications: from measuring material thickness to detecting corrosion damage. In nuclear power plants, eddy-current methods provide the best in-service inspection method for steam generator tubing. The following components are required to perform Eddy Current testing: an Eddy Current tester, a remote positioning device, and an eddy current probe drive control system.
The disadvantages of this technique are that it is sensitive to lift-off, it is a point test, so scanning is required for large areas, and it is generally limited to near surface defect of conducting materials.
Liquid Penetrant Testing
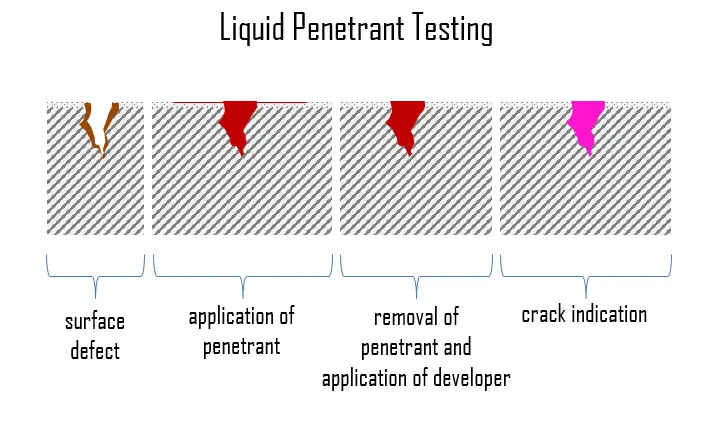
 Liquid penetrant inspection (LPI), also called dye penetrant inspection (DP), is a widely applied NDT method, which is used to check surface-breaking defects in all non-porous materials (metals, plastics, or ceramics). It is probably one of the most widely used NDT techniques. Test and pre-cleaned objects are coated with visible or fluorescent dye solution. Following a given time, ranging from 5 to 30 minutes depending on the material inspected, excess penetrant is removed from the surface, and a developer in liquid or powder form is applied. The developer acts as blotter, drawing trapped penetrant out of imperfections open to the surface. This developer absorbs penetrant drawn from discontinuities and reveals a vivid color contrast between the penetrant and developer (usually red on white). With fluorescent dyes, ultraviolet light is used to make the bleedout fluoresce brightly, thus allowing imperfections to be readily seen.
LPI is used to detect casting, forging and welding surface defects such as hairline cracks, surface porosity, leaks in new products, and fatigue cracks on in-service components.
Magnetic-particle Inspection
Magnetic-particle inspection is one of NDT processes for detecting surface and nearsurface imperfections and material discontinuities. This method is accomplished by inducing a magnetic field in a ferromagnetic material and then dusting the surface with fine ferromagnetic particles (either dry or suspended in liquid). These are attracted to an area of flux leakage and form what is known as an indication, which is evaluated to determine its nature, cause, and course of action, if any. Although this technique reveals the location of the defects, it is often unable to determine its depth.
The piece can be magnetized by direct or indirect magnetization. Direct magnetization occurs when the electric current is passed through the test object and a magnetic field is formed in the material. Indirect magnetization occurs when no electric current is passed through the test object, but a magnetic field is applied from an outside source. It has the major drawback of requiring to magnetize (and frequently demagnetize) the component.
We hope, this article, Surface NDT Methods, helps you. If so, give us a like in the sidebar. Main purpose of this website is to help the public to learn some interesting and important information about materials and their properties.