Hydrogen
N/A
Helium
N/A
Lithium
5 MPa
Beryllium
600 MPa
Boron
N/A
Carbon
N/A
Nitrogen
N/A
Oxygen
N/A
Fluorine
N/A
Neon
N/A
Sodium
0.69 MPa
Magnesium
260 MPa
Aluminium
240 MPa
Silicon
2300 MPa
Phosphorus
N/A
Sulfur
N/A
Chlorine
N/A
Argon
N/A
Potassium
0.36 MPa
Calcium
170 – 400 MPa
Scandium
740 – 1200 MPa
Titanium
700 – 2700 MPa
Vanadium
650 MPa
Chromium
1120 MPa
Manganese
200 MPa
Iron
490 MPa
Cobalt
800 MPa
Nickel
700 MPa
Copper
250 MPa
Zinc
330 MPa
Gallium
60 MPa
Germanium
N/A
Arsenic
1440 MPa
Selenium
740 MPa
Bromine
N/A
Krypton
N/A
Rubidium
0.216 MPa
Strontium
N/A
Yttrium
580 MPa
Zirconium
650 MPa
Niobium
740 MPa
Molybdenum
1500 MPa
Technetium
N/A
Ruthenium
2160 MPa
Rhodium
1100 MPa
Palladium
320 MPa
Silver
210 MPa
Cadmium
203 MPa
Indium
10 MPa
Tin
50 MPa
Antimony
300 MPa
Tellurium
200 MPa
Iodine
N/A
Xenon
N/A
Caesium
0.14 MPa
Lanthanoids
Hafnium
1700 MPa
Tantalum
800 MPa
Tungsten
3000 MPa
Rhenium
1400 MPa
Osmium
3900 MPa
Iridium
1670 MPa
Platinum
400 MPa
Gold
190 MPa
Mercury
N/A
Thallium
26.4 MPa
Lead
38 MPa
Bismuth
70 MPa
Polonium
N/A
Astatine
N/A
Radon
N/A
Francium
N/A
Radium
N/A
Actinoids
Rutherfordium
N/A
Dubnium
N/A
Seaborgium
N/A
Bohrium
N/A
Hassium
N/A
Meitnerium
N/A
Darmstadtium
N/A
Roentgenium
N/A
Copernicium
N/A
Nihonium
N/A
Flerovium
N/A
Moscovium
N/A
Livermorium
N/A
Tennessine
N/A
Oganesson
N/A
Lanthanum
350 MPa
Cerium
412 MPa
Praseodymium
490 MPa
Neodymium
265 MPa
Promethium
N/A
Samarium
441 MPa
Europium
N/A
Gadolinium
N/A
Terbium
680 MPa
Dysprosium
500 MPa
Holmium
750 MPa
Erbium
800 MPa
Thulium
470 MPa
Ytterbium
340 MPa
Lutetium
900 MPa
Actinium
N/A
Thorium
400 MPa
Protactinium
N/A
Uranium
2400 MPa
Neptunium
N/A
Plutonium
N/A
Americium
N/A
Curium
N/A
Berkelium
N/A
Californium
N/A
Einsteinium
N/A
Fermium
N/A
Mendelevium
N/A
Nobelium
N/A
Lawrencium
N/A
Hardness of Chemical Elements
In materials science, hardness is the ability to withstand surface indentation (localized plastic deformation) and scratching. Hardness is probably the most poorly defined material property because it may indicate resistance to scratching, resistance to abrasion, resistance to indentation or even resistance to shaping or localized plastic deformation. Hardness is important from an engineering standpoint because resistance to wear by either friction or erosion by steam, oil, and water generally increases with hardness.
There are three main types of hardness measurements:
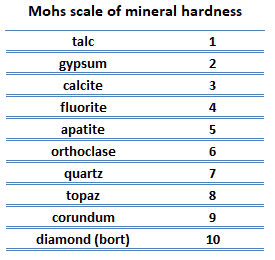 Scratch hardness. Scratch hardness is the measure of how resistant a sample is to permanent plastic deformation due to friction from a sharp object. The most common scale for this qualitative test is Mohs scale, which is used in mineralogy. The Mohs scale of mineral hardness is based on the ability of one natural sample of mineral to scratch another mineral visibly. The hardness of a material is measured against the scale by finding the hardest material that the given material can scratch, or the softest material that can scratch the given material. For example, if some material is scratched by topaz but not by quartz, its hardness on the Mohs scale would fall between 7 and 8.
- Indentation hardness. Indentation hardness measures the ability to withstand surface indentation (localized plastic deformation) and the resistance of a sample to material deformation due to a constant compression load from a sharp object. Tests for indentation hardness are primarily used in engineering and metallurgy fields. The traditional methods are based on well-defined physical indentation hardness tests. Very hard indenters of defined geometries and sizes are continuously pressed into the material under a particular force. Deformation parameters, such as the indentation depth in the Rockwell method, are recorded to give measures of hardness. Common indentation hardness scales are Brinell, Rockwell and Vickers.
- Rebound hardness. Rebound hardness, also known as dynamic hardness, measures the height of the “bounce” of a diamond-tipped hammer dropped from a fixed height onto a material. One of devices used to take this measurement is known as a scleroscope. It consists of a steel ball dropped from a fixed height. This type of hardness is related to elasticity.
Within each of these classes of measurement there are individual measurement scales. For practical reasons conversion tables are used to convert between one scale and another.
Measuring Hardness
Many techniques have been developed for obtaining a qualitative measure and a quantitative measure of hardness. Among the most popular are indentation tests, which are based on the ability of a material to withstand surface indentation (localized plastic deformation). Those most often used are Brinell, Rockwell, Vickers, Tukon, Sclerscope, and the Leeb rebound hardness test. The first four are based on indentation tests and the fifth on the rebound height of a diamond-tipped metallic hammer. According to the dynamic Leeb principle, hardness value is derived from the energy loss of a defined impact body after impacting on a metal sample, similar to the Shore scleroscope. As a result of many tests, comparisons have been prepared using formulas, tables, and graphs that show the relationships between the results of various hardness tests of specific alloys. There is, however, no exact mathematical relation between any two of the methods.
Brinell Hardness Test
Brinell hardness test is one of indentation hardness tests, that has been developed for hardness testing. In Brinell tests, a hard, spherical indenter is forced under a specific load into the surface of the metal to be tested. The typical test uses a 10 mm (0.39 in) diameter hardened steel ball as an indenter with a 3,000 kgf (29.42 kN; 6,614 lbf) force. The load is maintained constant for a specified time (between 10 and 30 s). For softer materials, a smaller force is used; for harder materials, a tungsten carbide ball is substituted for the steel ball.
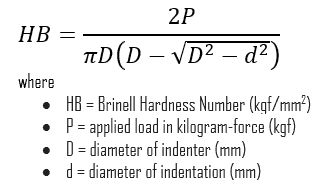
The test provides numerical results to quantify the hardness of a material, which is expressed by the Brinell hardness number – HB. The Brinell hardness number is designated by the most commonly used test standards (ASTM E10-14[2] and ISO 6506–1:2005) as HBW (H from hardness, B from brinell and W from the material of the indenter, tungsten (wolfram) carbide). In former standards HB or HBS were used to refer to measurements made with steel indenters.
The Brinell hardness number (HB) is the load divided by the surface area of the indentation. The diameter of the impression is measured with a microscope with a superimposed scale. The Brinell hardness number is computed from the equation:
There are a variety of test methods in common use (e.g. Brinell, Knoop, Vickers and Rockwell). There are tables that are available correlating the hardness numbers from the different test methods where correlation is applicable. In all scales, a high hardness number represents a hard metal.
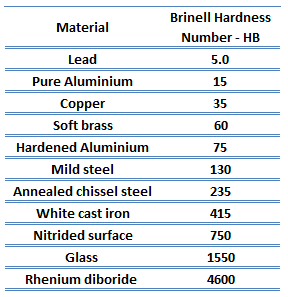 Besides the correlation between different hardness numbers, there are also some correlations possible with other material properties. For example, for heat-treated plain carbon steels and medium alloy steels, another convenient conversion is that of Brinell hardness to ultimate tensile strength. In this case, the ultimate tensile strength (in psi) approximately equals the Brinell Hardness Number multiplied by 500. Generally, a high hardness will indicate a relatively high strength and low ductility in the material.
In industry, hardness tests on metals are used mainly as a check on the quality and uniformity of metals, especially during heat treatment operations. The tests can generally be applied to the finished product without significant damage.
Rockwell Hardness Test
Rockwell hardness test is one of the most common indentation hardness tests, that has been developed for hardness testing. In contrast to Brinell test, the Rockwell tester measures the depth of penetration of an indenter under a large load (major load) compared to the penetration made by a preload (minor load). The minor load establishes the zero position. The major load is applied, then removed while still maintaining the minor load. The difference between depth of penetration before and after application of the major load is used to calculate the Rockwell hardness number. That is, the penetration depth and hardness are inversely proportional. The chief advantage of Rockwell hardness is its ability to display hardness values directly. The result is a dimensionless number noted as HRA, HRB, HRC, etc., where the last letter is the respective Rockwell scale.
Several different scales may be used from possible combinations of various indenters and different loads a process that permits the testing of virtually all metal alloys. The test provides results to quantify the hardness of a material, which is expressed by the Rockwell hardness number – HR, which is directly displayed on the dial. The various indenter types combined with a range of test loads form a matrix of Rockwell hardness scales that are applicable to a wide variety of materials. Rockwell B and Rockwell C are the typical tests in this facility. The Rockwell B penetrator is a 1.59mm (1/16 inch) diameter tungsten-carbide ball and the major load is 100kg. The Rockwell C test is performed with a Brale penetrator (120°diamond cone) and a major load of 150kg.
Each Rockwell hardness scale is identified by a letter designation indicative of the indenter type and the major and minor loads used for the test. The Rockwell hardness number is expressed as a combination of the measured numerical hardness value and the scale letter preceded by the letters, HR.
There are a variety of hardness test methods in common use (e.g. Brinell, Knoop, Vickers and Rockwell). There are tables that are available correlating the hardness numbers from the different test methods where correlation is applicable. In all scales, a high hardness number represents a hard metal.
In industry, hardness tests on metals are used mainly as a check on the quality and uniformity of metals, especially during heat treatment operations. The tests can generally be applied to the finished product without significant damage. Commercial popularity of the Rockwell hardness test arises from its speed, reliability, robustness, resolution and small area of indentation.
Vickers Hardness Test
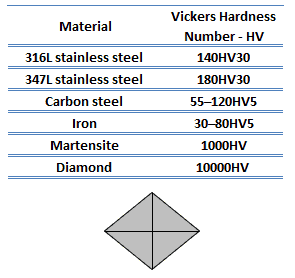 The Vickers hardness test method was developed by Robert L. Smith and George E. Sandland at Vickers Ltd as an alternative to the Brinell method to measure the hardness of materials. The Vickers hardness test method can be also used as a microhardness test method, which is mostly used for small parts, thin sections, or case depth work. Since the test indentation is very small in a Vickers microhardness test, it is useful for a variety of applications such as: testing very thin materials like foils or measuring the surface of a part, small parts or small areas.
The Vickers method is based on an optical measurement system. The Microhardness test procedure, ASTM E-384, specifies a range of light loads using a diamond indenter to make an indentation which is measured and converted to a hardness value. The Vickers test is often easier to use than other hardness tests since the required calculations are independent of the size of the indenter, and the indenter can be used for all materials irrespective of hardness. A square base pyramid shaped diamond is used for testing in the Vickers scale. For microindentation typical loads are very light, ranging from 10gf to 1kgf, although macroindentation Vickers loads can range up to 30 kg or more.
