Hydrogen
Nonmetals
Helium
Noble gas
Lithium
Alkali metal
Beryllium
Alkaline earth metal
Boron
Metalloids
Carbon
Nonmetals
Nitrogen
Nonmetals
Oxygen
Nonmetals
Fluorine
Nonmetals
Neon
Noble gas
Sodium
Alkali metal
Magnesium
Alkaline earth metal
Aluminium
Post-transition metals
Silicon
Metalloids
Phosphorus
Nonmetal
Sulfur
Nonmetal
Chlorine
Nonmetal
Argon
Noble gas
Potassium
Alkali metal
Calcium
Alkaline earth metal
Scandium
Transition metals
Titanium
Transition metals
Vanadium
Transition metals
Chromium
Transition metals
Manganese
Transition metals
Iron
Transition metals
Cobalt
Transition metals
Nickel
Transition metals
Copper
Transition metals
Zinc
Transition metals
Gallium
Post-transition metals
Germanium
Metalloids
Arsenic
Metalloids
Selenium
Nonmetal
Bromine
Nonmetal
Krypton
Noble gas
Rubidium
Alkali metals
Strontium
Alkaline earth metals
Yttrium
Transition metals
Zirconium
Transition metals
Niobium
Transition metals
Molybdenum
Transition metals
Technetium
Transition metals
Ruthenium
Transition metals
Rhodium
Transition metals
Palladium
Transition metals
Silver
Transition metals
Cadmium
Transition metals
Indium
Post-transition metals
Tin
Post-transition metals
Antimony
Metalloids
Tellurium
Metalloids
Iodine
Nonmetal
Xenon
Noble gas
Caesium
Alkali metals
Lanthanoids
Hafnium
Transition metals
Tantalum
Transition metals
Tungsten
Transition metals
Rhenium
Transition metals
Osmium
Transition metals
Iridium
Transition metals
Platinum
Transition metals
Gold
Transition metals
Mercury
Transition metals
Thallium
Post-transition metals
Lead
Post-transition metals
Bismuth
Post-transition metals
Polonium
Post-transition metals
Astatine
Metalloids
Radon
Noble gas
Francium
Alkali metal
Radium
Alkaline earth metal
Actinoids
Rutherfordium
Transition metal
Dubnium
Transition metal
Seaborgium
Transition metal
Bohrium
Transition metal
Hassium
Transition metal
Meitnerium
Darmstadtium
Roentgenium
Copernicium
Nihonium
Flerovium
Moscovium
Livermorium
Tennessine
Oganesson
Lanthanum
Lanthanoids
Cerium
Lanthanoids
Praseodymium
Lanthanoids
Neodymium
Lanthanoids
Promethium
Lanthanoids
Samarium
Lanthanoids
Europium
Lanthanoids
Gadolinium
Lanthanoids
Terbium
Lanthanoids
Dysprosium
Lanthanoids
Holmium
Lanthanoids
Erbium
Lanthanoids
Thulium
Lanthanoids
Ytterbium
Lanthanoids
Lutetium
Lanthanoids
Actinium
Actinoids
Thorium
Actinoids
Protactinium
Actinoids
Uranium
Actinoids
Neptunium
Actinoids
Plutonium
Actinoids
Americium
Actinoids
Curium
Actinoids
Berkelium
Actinoids
Californium
Actinoids
Einsteinium
Actinoids
Fermium
Actinoids
Mendelevium
Actinoids
Nobelium
Actinoids
Lawrencium
Actinoids
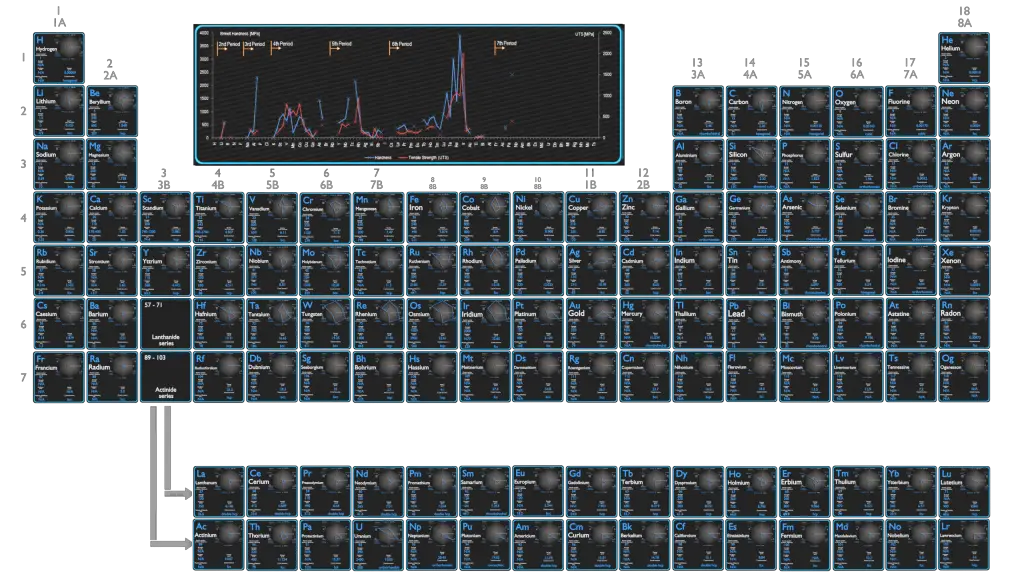
Hardness of Chemical Elements
In materials science, hardness is the ability to withstand surface indentation (localized plastic deformation) and scratching. Hardness is probably the most poorly defined material property because it may indicate resistance to scratching, resistance to abrasion, resistance to indentation or even resistance to shaping or localized plastic deformation. Hardness is important from an engineering standpoint because resistance to wear by either friction or erosion by steam, oil, and water generally increases with hardness.
There are three main types of hardness measurements:
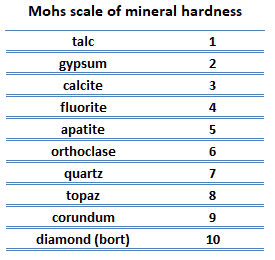 Scratch hardness. Scratch hardness is the measure of how resistant a sample is to permanent plastic deformation due to friction from a sharp object. The most common scale for this qualitative test is Mohs scale, which is used in mineralogy. The Mohs scale of mineral hardness is based on the ability of one natural sample of mineral to scratch another mineral visibly. The hardness of a material is measured against the scale by finding the hardest material that the given material can scratch, or the softest material that can scratch the given material. For example, if some material is scratched by topaz but not by quartz, its hardness on the Mohs scale would fall between 7 and 8.
- Indentation hardness. Indentation hardness measures the ability to withstand surface indentation (localized plastic deformation) and the resistance of a sample to material deformation due to a constant compression load from a sharp object. Tests for indentation hardness are primarily used in engineering and metallurgy fields. The traditional methods are based on well-defined physical indentation hardness tests. Very hard indenters of defined geometries and sizes are continuously pressed into the material under a particular force. Deformation parameters, such as the indentation depth in the Rockwell method, are recorded to give measures of hardness. Common indentation hardness scales are Brinell, Rockwell and Vickers.
- Rebound hardness. Rebound hardness, also known as dynamic hardness, measures the height of the “bounce” of a diamond-tipped hammer dropped from a fixed height onto a material. One of devices used to take this measurement is known as a scleroscope. It consists of a steel ball dropped from a fixed height. This type of hardness is related to elasticity.
Within each of these classes of measurement there are individual measurement scales. For practical reasons conversion tables are used to convert between one scale and another.
Measuring Hardness
Many techniques have been developed for obtaining a qualitative measure and a quantitative measure of hardness. Among the most popular are indentation tests, which are based on the ability of a material to withstand surface indentation (localized plastic deformation). Those most often used are Brinell, Rockwell, Vickers, Tukon, Sclerscope, and the Leeb rebound hardness test. The first four are based on indentation tests and the fifth on the rebound height of a diamond-tipped metallic hammer. According to the dynamic Leeb principle, hardness value is derived from the energy loss of a defined impact body after impacting on a metal sample, similar to the Shore scleroscope. As a result of many tests, comparisons have been prepared using formulas, tables, and graphs that show the relationships between the results of various hardness tests of specific alloys. There is, however, no exact mathematical relation between any two of the methods.
Brinell Hardness Test
Brinell hardness test is one of indentation hardness tests, that has been developed for hardness testing. In Brinell tests, a hard, spherical indenter is forced under a specific load into the surface of the metal to be tested. The typical test uses a 10 mm (0.39 in) diameter hardened steel ball as an indenter with a 3,000 kgf (29.42 kN; 6,614 lbf) force. The load is maintained constant for a specified time (between 10 and 30 s). For softer materials, a smaller force is used; for harder materials, a tungsten carbide ball is substituted for the steel ball.
The test provides numerical results to quantify the hardness of a material, which is expressed by the Brinell hardness number – HB. The Brinell hardness number is designated by the most commonly used test standards (ASTM E10-14[2] and ISO 6506–1:2005) as HBW (H from hardness, B from brinell and W from the material of the indenter, tungsten (wolfram) carbide). In former standards HB or HBS were used to refer to measurements made with steel indenters.
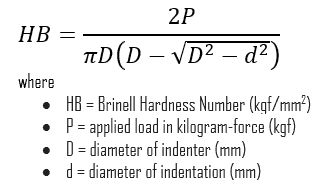
The Brinell hardness number (HB) is the load divided by the surface area of the indentation. The diameter of the impression is measured with a microscope with a superimposed scale. The Brinell hardness number is computed from the equation:
There are a variety of test methods in common use (e.g. Brinell, Knoop, Vickers and Rockwell). There are tables that are available correlating the hardness numbers from the different test methods where correlation is applicable. In all scales, a high hardness number represents a hard metal.
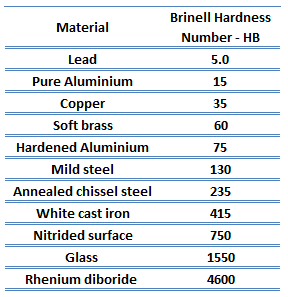 Besides the correlation between different hardness numbers, there are also some correlations possible with other material properties. For example, for heat-treated plain carbon steels and medium alloy steels, another convenient conversion is that of Brinell hardness to ultimate tensile strength. In this case, the ultimate tensile strength (in psi) approximately equals the Brinell Hardness Number multiplied by 500. Generally, a high hardness will indicate a relatively high strength and low ductility in the material.
In industry, hardness tests on metals are used mainly as a check on the quality and uniformity of metals, especially during heat treatment operations. The tests can generally be applied to the finished product without significant damage.
Rockwell Hardness Test
Rockwell hardness test is one of the most common indentation hardness tests, that has been developed for hardness testing. In contrast to Brinell test, the Rockwell tester measures the depth of penetration of an indenter under a large load (major load) compared to the penetration made by a preload (minor load). The minor load establishes the zero position. The major load is applied, then removed while still maintaining the minor load. The difference between depth of penetration before and after application of the major load is used to calculate the Rockwell hardness number. That is, the penetration depth and hardness are inversely proportional. The chief advantage of Rockwell hardness is its ability to display hardness values directly. The result is a dimensionless number noted as HRA, HRB, HRC, etc., where the last letter is the respective Rockwell scale.
Several different scales may be used from possible combinations of various indenters and different loads a process that permits the testing of virtually all metal alloys. The test provides results to quantify the hardness of a material, which is expressed by the Rockwell hardness number – HR, which is directly displayed on the dial. The various indenter types combined with a range of test loads form a matrix of Rockwell hardness scales that are applicable to a wide variety of materials. Rockwell B and Rockwell C are the typical tests in this facility. The Rockwell B penetrator is a 1.59mm (1/16 inch) diameter tungsten-carbide ball and the major load is 100kg. The Rockwell C test is performed with a Brale penetrator (120°diamond cone) and a major load of 150kg.
Each Rockwell hardness scale is identified by a letter designation indicative of the indenter type and the major and minor loads used for the test. The Rockwell hardness number is expressed as a combination of the measured numerical hardness value and the scale letter preceded by the letters, HR.
There are a variety of hardness test methods in common use (e.g. Brinell, Knoop, Vickers and Rockwell). There are tables that are available correlating the hardness numbers from the different test methods where correlation is applicable. In all scales, a high hardness number represents a hard metal.
In industry, hardness tests on metals are used mainly as a check on the quality and uniformity of metals, especially during heat treatment operations. The tests can generally be applied to the finished product without significant damage. Commercial popularity of the Rockwell hardness test arises from its speed, reliability, robustness, resolution and small area of indentation.
Vickers Hardness Test
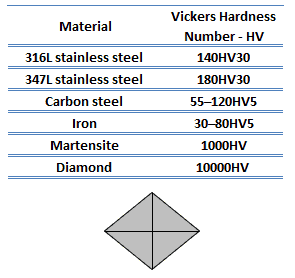 The Vickers hardness test method was developed by Robert L. Smith and George E. Sandland at Vickers Ltd as an alternative to the Brinell method to measure the hardness of materials. The Vickers hardness test method can be also used as a microhardness test method, which is mostly used for small parts, thin sections, or case depth work. Since the test indentation is very small in a Vickers microhardness test, it is useful for a variety of applications such as: testing very thin materials like foils or measuring the surface of a part, small parts or small areas.
The Vickers method is based on an optical measurement system. The Microhardness test procedure, ASTM E-384, specifies a range of light loads using a diamond indenter to make an indentation which is measured and converted to a hardness value. The Vickers test is often easier to use than other hardness tests since the required calculations are independent of the size of the indenter, and the indenter can be used for all materials irrespective of hardness. A square base pyramid shaped diamond is used for testing in the Vickers scale. For microindentation typical loads are very light, ranging from 10gf to 1kgf, although macroindentation Vickers loads can range up to 30 kg or more.
Strength of Chemical Materials
 Strength of materials basically considers the relationship between the external loads applied to a material and the resulting deformation or change in material dimensions. In designing structures and machines, it is important to consider these factors, in order that the material selected will have adequate strength to resist applied loads or forces and retain its original shape. Strength of a material is its ability to withstand this applied load without failure or plastic deformation.
However, we must note that the load which will deform a small component, will be less than the load to deform a larger component of the same material. Therefore, the load (force) is not a suitable term to describe strength. Instead, we can use the force (load) per unit of area (σ = F/A), called stress, which is constant (until deformation occurs) for a given material regardless of size of the component part. In this concept, strain is also very important variable, since it defines the deformation of an object. In summary, the mechanical behavior of solids is usually defined by constitutive stress-strain relations. A deformation is called elastic deformation, if the stress is a linear function of strain. In other words, stress and strain follows Hooke’s law. Beyond the linear region, stress and strain show nonlinear behavior. This inelastic behavior is called plastic deformation.
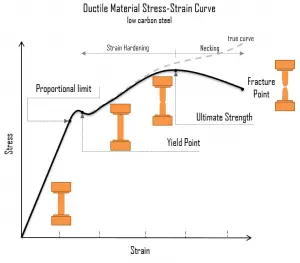
A schematic diagram for the stress-strain curve of low carbon steel at room temperature is shown in the figure. There are several stages showing different behaviors, which suggests different mechanical properties. To clarify, materials can miss one or more stages shown in the figure, or have totally different stages. In this case we have to distinguish between stress-strain characteristics of ductile and brittle materials. The following points describe the different regions of the stress-strain curve and the importance of several specific locations.
- Proportional limit. The proportional limit corresponds to the location of stress at the end of the linear region, so the stress-strain graph is a straight line, and the gradient will be equal to the elastic modulus of the material. For tensile and compressive stress, the slope of the portion of the curve where stress is proportional to strain is referred to as Young’s modulus and Hooke’s Law applies. Between the proportional limit and the yield point the Hooke’s Law becomes questionable between and strain increases more rapidly.
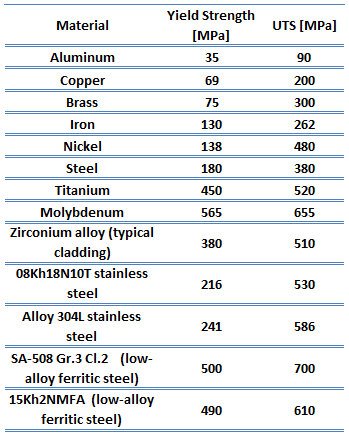 Yield point. The yield point is the point on a stress-strain curve that indicates the limit of elastic behavior and the beginning plastic behavior. Yield strength or yield stress is the material property defined as the stress at which a material begins to deform plastically whereas yield point is the point where nonlinear (elastic + plastic) deformation begins. Prior to the yield point, the material will deform elastically and will return to its original shape when the applied stress is removed. Once the yield point is passed, some fraction of the deformation will be permanent and non-reversible. Some steels and other materials exhibit a behaviour termed a yield point phenomenon. Yield strengths vary from 35 MPa for a low-strength aluminum to greater than 1400 MPa for very high-strength steels.
- Ultimate tensile strength. The ultimate tensile strength is the maximum on the engineering stress-strain curve. This corresponds to the maximum stress that can be sustained by a structure in tension. Ultimate tensile strength is often shortened to “tensile strength” or even to “the ultimate.” If this stress is applied and maintained, fracture will result. Often, this value is significantly more than the yield stress (as much as 50 to 60 percent more than the yield for some types of metals). When a ductile material reaches its ultimate strength, it experiences necking where the cross-sectional area reduces locally. The stress-strain curve contains no higher stress than the ultimate strength. Even though deformations can continue to increase, the stress usually decreases after the ultimate strength has been achieved. It is an intensive property; therefore its value does not depend on the size of the test specimen. However, it is dependent on other factors, such as the preparation of the specimen, the presence or otherwise of surface defects, and the temperature of the test environment and material. Ultimate tensile strengths vary from 50 MPa for an aluminum to as high as 3000 MPa for very high-strength steels.
- Fracture point: The fracture point is the point of strain where the material physically separates. At this point, the strain reaches its maximum value and the material actually fractures, even though the corresponding stress may be less than the ultimate strength at this point. Ductile materials have a fracture strength lower than the ultimate tensile strength (UTS), whereas in brittle materials the fracture strength is equivalent to the UTS. If a ductile material reaches its ultimate tensile strength in a load-controlled situation, it will continue to deform, with no additional load application, until it ruptures. However, if the loading is displacement-controlled, the deformation of the material may relieve the load, preventing rupture.
In many situations, the yield strength is used to identify the allowable stress to which a material can be subjected. For components that have to withstand high pressures, such as those used in pressurized water reactors (PWRs), this criterion is not adequate. To cover these situations, the maximum shear stress theory of failure has been incorporated into the ASME (The American Society of Mechanical Engineers) Boiler and Pressure Vessel Code, Section III, Rules for Construction of Nuclear Pressure Vessels. This theory states that failure of a piping component occurs when the maximum shear stress exceeds the shear stress at the yield point in a tensile test.
Modulus of Elasticity of Chemical Elements
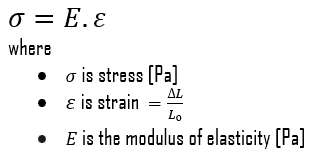
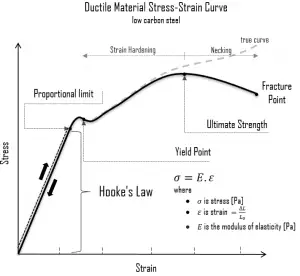 In case of tensional stress of a uniform bar (stress-strain curve), the Hooke’s law describes behaviour of a bar in the elastic region. In this region, the elongation of the bar is directly proportional to the tensile force and the length of the bar and inversely proportional to the cross-sectional area and the modulus of elasticity. Up to a limiting stress, a body will be able to recover its dimensions on removal of the load. The applied stresses cause the atoms in a crystal to move from their equilibrium position. All the atoms are displaced the same amount and still maintain their relative geometry. When the stresses are removed, all the atoms return to their original positions and no permanent deformation occurs. According to the Hooke’s law, the stress is proportional to the strain (in the elastic region), and the slope is Young’s modulus.
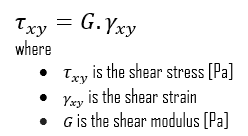
We can extend the same idea of relating stress to strain to shear applications in the linear region, relating shear stress to shear strain to create Hooke’s law for shear stress:
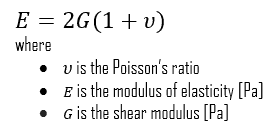
For isotropic materials within the elastic region, you can relate Poisson’s ratio (ν), Young’s modulus of elasticity (E), and the shear modulus of elasticity (G):
The elastic moduli relevant to polycrystalline materials:
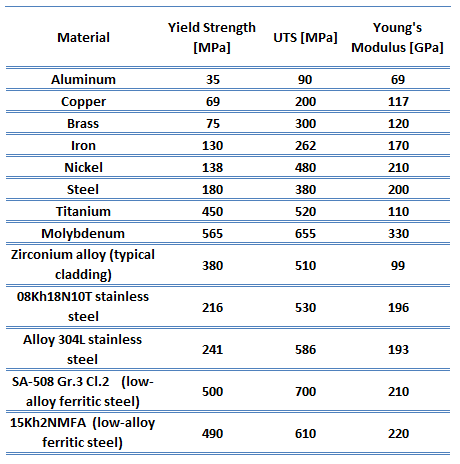 Young’s Modulus of Elasticity. The Young’s modulus of elasticity is the elastic modulus for tensile and compressive stress in the linear elasticity regime of a uniaxial deformation and is usually assessed by tensile tests.
- Shear Modulus of Elasticity. The shear modulus, or the modulus of rigidity, is derived from the torsion of a cylindrical test piece. It describes the material’s response to shear stress. Its symbol is G. The shear modulus is one of several quantities for measuring the stiffness of materials and it arises in the generalized Hooke’s law.
- Bulk Modulus of Elasticity. The bulk modulus of elasticity is describes volumetric elasticity, or the tendency of an object to deform in all directions when uniformly loaded in all directions. For example, it describes the elastic response to hydrostatic pressure and equilateral tension (like the pressure at the bottom of the ocean or a deep swimming pool). It is also the property of a material that determines the elastic response to the application of stress. For a fluid, only the bulk modulus is meaningful.
